通过前几篇的文章(查看系列文章: ),我们清楚了Activity实际上是将视图的创建和显示交给了Window对象进行了处理并分析了视图的测量、布局及绘制过程。本篇文章将继续详细分析Window及WindowManger的作用。
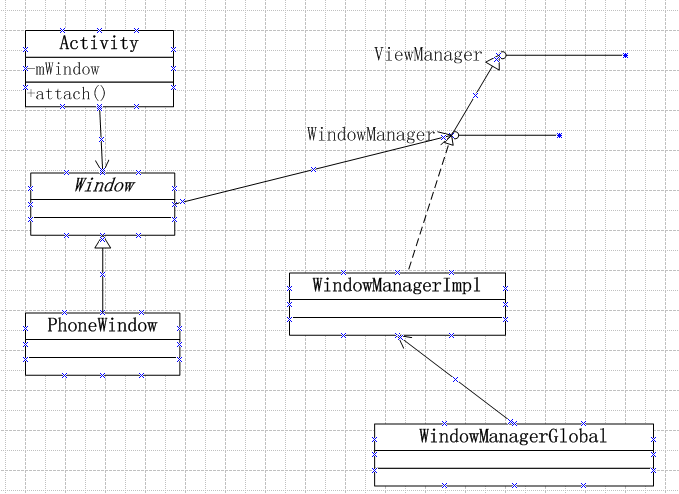
首先,我们将通过下图弄清楚他们之间的关系。

通过前几篇的文章,我们清楚了Activity实际上是将视图的创建和显示交给了Window对象进行了处理并分析了视图的测量、布局及绘制过程。本篇文章将继续详细分析Window及WindowManger的作用。
首先,我们将通过下图弄清楚他们之间的关系。
/** Flag for the "options panel" feature. This is enabled by default. */ public static final int FEATURE_OPTIONS_PANEL = 0; /** Flag for the "no title" feature, turning off the title at the top * of the screen. */ public static final int FEATURE_NO_TITLE = 1; //无标题栏 /** Flag for the progress indicator feature */ public static final int FEATURE_PROGRESS = 2; //在标题栏上添加加载进度条 /** Flag for having an icon on the left side of the title bar */ public static final int FEATURE_LEFT_ICON = 3; /** Flag for having an icon on the right side of the title bar */ public static final int FEATURE_RIGHT_ICON = 4; /** Flag for indeterminate progress */ public static final int FEATURE_INDETERMINATE_PROGRESS = 5; /** Flag for the context menu. This is enabled by default. */ public static final int FEATURE_CONTEXT_MENU = 6; /** Flag for custom title. You cannot combine this feature with other title features. */public static final int FEATURE_CUSTOM_TITLE = 7;public static final int FEATURE_ACTION_BAR = 8;public static final int FEATURE_ACTION_BAR_OVERLAY = 9;public static final int FEATURE_ACTION_MODE_OVERLAY = 10;public static final int FEATURE_MAX = FEATURE_ACTION_MODE_OVERLAY; /** Flag for setting the progress bar's visibility to VISIBLE */ public static final int PROGRESS_VISIBILITY_ON = -1; /** Flag for setting the progress bar's visibility to GONE */ public static final int PROGRESS_VISIBILITY_OFF = -2; /** Flag for setting the progress bar's indeterminate mode on */ public static final int PROGRESS_INDETERMINATE_ON = -3; /** Flag for setting the progress bar's indeterminate mode off */ public static final int PROGRESS_INDETERMINATE_OFF = -4; /** Starting value for the (primary) progress */ public static final int PROGRESS_START = 0; /** Ending value for the (primary) progress */ public static final int PROGRESS_END = 10000; /** Lowest possible value for the secondary progress */ public static final int PROGRESS_SECONDARY_START = 20000; /** Highest possible value for the secondary progress */public static final int PROGRESS_SECONDARY_END = 30000;
那么如何应用这些窗口特征呢?在Activity中,我们可以调用方法requestWindowFeature,实际此方法是调用了Window中的requestFeature的方法,方法原型如下:
public boolean requestFeature(int featureId) { final int flag = 1< 注意此方法必须在setContentView方法之前调用才有效,一旦应用了这些窗口特征后续不可更改。
在window中定义了一个CallBack接口,此接口中一定了一系列的时间回调方法,用于处理UI的各种事件,如按键事件、触摸事件、轨迹球、Accessibility事件、菜单事件等等。比如Activity就实现了此接口。关于事件这块的内容,我们后面专门做分析研究。
在window中还定义了WindowManager,从字面上可以理解为窗口管理器,实际上它并不是真正的窗口管理器,WindowManager Service才是Android中真正意义上的窗口管理器。实际上Window内的WindowManager只是用于管理Window内部的视图,通过方法setWindowManager,可以看到Window中是如何创建WindowManager的,具体源码如下:
public void setWindowManager(WindowManager wm, IBinder appToken, String appName, boolean hardwareAccelerated) { mAppToken = appToken; mAppName = appName; mHardwareAccelerated = hardwareAccelerated || SystemProperties.getBoolean(PROPERTY_HARDWARE_UI, false); if (wm == null) { wm = (WindowManager)mContext.getSystemService(Context.WINDOW_SERVICE); } mWindowManager = ((WindowManagerImpl)wm).createLocalWindowManager(this); } 通过该方法我们可以看到通过WindowManagerImpl的createLoaclWindowManager方法创建了一个WindowManager对象。
从上图中,我们看出WindowManager接口是继承了ViewManager接口,从源码中可以看出ViewManager接口只有三个方法,具体如下:
public interface ViewManager{ public void addView(View view, ViewGroup.LayoutParams params); public void updateViewLayout(View view, ViewGroup.LayoutParams params); public void removeView(View view);} 很好理解主要用于window中view的添加、更新和删除。
WindowManager接口内容也比较简单,除了继承自ViewManager中的方法外,还定义了3个内部类和两个方法,具体API如下。

在这里我们要重点关注一下LayoutParams这个内部类,此类定义了许多与窗口相关的属性,比如位置、窗口类型(主要有三类:Application Windows、Sub-windows、System windows)、行为选项标志、窗口透明度等等,在此不再贴源码了,有兴趣的可以自行查看。
从window中的方法setWindowManager中可以看出创建的WindowManager的对象实际上是WindowManagerImpl,此类是WindowManager的实现类,源码如下:
public final class WindowManagerImpl implements WindowManager { private final WindowManagerGlobal mGlobal = WindowManagerGlobal.getInstance(); private final Display mDisplay; private final Window mParentWindow; public WindowManagerImpl(Display display) { this(display, null); } private WindowManagerImpl(Display display, Window parentWindow) { mDisplay = display; mParentWindow = parentWindow; } public WindowManagerImpl createLocalWindowManager(Window parentWindow) { return new WindowManagerImpl(mDisplay, parentWindow); } public WindowManagerImpl createPresentationWindowManager(Display display) { return new WindowManagerImpl(display, mParentWindow); } @Override public void addView(View view, ViewGroup.LayoutParams params) { mGlobal.addView(view, params, mDisplay, mParentWindow); } @Override public void updateViewLayout(View view, ViewGroup.LayoutParams params) { mGlobal.updateViewLayout(view, params); } @Override public void removeView(View view) { mGlobal.removeView(view, false); } @Override public void removeViewImmediate(View view) { mGlobal.removeView(view, true); } @Override public Display getDefaultDisplay() { return mDisplay; }} 该实现类比较简单,主要持有Window类型的mParentWindow对象,并提供一系列的方法用于构建WindowManagerImpl对象,其他方法的实现主要调用WindowManagerGlobal对象中的响应方法。
在window的setWindowManager方法主要调用了WindowManagerImpl的createLocalWindowManager创建了WindowManager对象,这样就将Window和WindowManager关联起来了,也就意味在调用WindowManager的addView、updateViewLayout、removeView时实际上操作的是Window内部的View,这一点可以通过查看WindowManagerGlobal相关方法的源码可以看出。
疑问咨询或技术交流,请加入官方QQ群: (452379712)